Getting Started
Please note the following:
The JumpChat SDK DOES NOT work with the simulator.
Follow the steps and you should be able to add video chat into your iOS app.
Here’s an overview of the things you’ll accomplish in this tutorial.
Overview
Step 1: Download JumpChat iOS SDK
Download the sdk from the following url and unzip the file.
% wget https://dl.jumpch.at/sdk/jumpchat-ios-sdk-latest.zip
Step 2: Update project to use the SDK
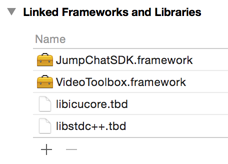
Copy the JumpChatSDK.framework into your project. Select project settings and General tab. Make sure JumpChatSDK.framework is added. Also add VideoToolbox.framework, libicucore.tbd, and libstdc++.tbd.
JumpChatSDK.framework
VideoToolbox.framework
libicucore.tbd
libstdc++.tbd
Disable Bitcode.

Allow jumpch.at domain to App Transport Security Settings. You can add the following to your Info.plist
<key>NSAppTransportSecurity</key>
<dict>
  <key>NSExceptionDomains</key>
  <dict>
    <key>jumpch.at</key>
    <dict>
      <key>NSExceptionAllowsInsecureHTTPLoads</key>
      <true/>
    </dict>
  </dict>
</dict>
Your Info.plist should look like this in the settings afterwards.

Add the following linker flags.
-ObjC

Step 3. Implement client delegate
Implement the client delegate methods. Add JCClientDelegate to the interface definition of the UIController class. Implement the videoAdded and videoRemoved methods specified from the JCClientDelegate protocol.
#import <JumpChatSDK/JumpChatSDK.h>
...

// Step 3. Add JCClientDelegate protocol to interface definition
@interface ViewController () <JCClientDelegate>
...
@end


// Step 3. Implement client delegate
#pragma mark JumpChat Client Delegate
- (void)jc:(JCClient *)jc videoAdded:(NSString *)userid view:(JCGLVideoView *)view {
    [self.view addSubview:view];
}

- (void)jc:(JCClient *)jc videoRemoved:(NSString *)userid view:(JCGLVideoView *)view {
    [view removeFromSuperview];
}
Step 4. Create the JumpChat client object
In your UIController class, create a jc property to save the JCClient object. Then create a JCClient object with initWithDelegate: method.
#import <JumpChatSDK/JumpChatSDK.h>
...

@interface ViewController () <JCClientDelegate>
...
// Step 4. Create property to save JCClient
@property (nonatomic, strong) JCClient *jc;
...
@end

- (void)viewDidLoad
{
    [super viewDidLoad];
    ...

    // Step 4. Create the JumpChat client object
    self.jc = [[JCClient alloc] initWithDelegate:self options:nil];

    ...
}
Step 5. Start broadcasting
In your UIController class, create a JCClient object with initWithDelegate: method. This will start broadcasting and create a local video object.
- (void)viewDidLoad
{
    [super viewDidLoad];
    // Do any additional setup after loading the view, typically from a nib.

    // Step 4. Create the JumpChat client object
    self.jc = [[JCClient alloc] initWithDelegate:self options:nil];

    // Step 5. Start broadcasting
    [self.jc startBroadcasting];
}
Step 6. Join room
Create a button button and hook up a method to connect & disconnect.
#import <JumpChatSDK/JumpChatSDK.h>
...

@interface ViewController () <JCClientDelegate>
...
// Step 4. Create property to save JCClient
@property (nonatomic, strong) JCClient *jc;

// Step 6. Connect button
@property (weak, nonatomic) IBOutlet UIButton *connectButton;
...
@end

- (void)viewDidLoad
{
    [super viewDidLoad];
    // Do any additional setup after loading the view, typically from a nib.

    // Step 4. Create the JumpChat client object
    self.jc = [[JCClient alloc] initWithDelegate:self options:nil];

    // Step 5. Start broadcasting
    [self.jc startBroadcasting];

    // Step 6. Setup toggle text.
    [self.connectButton setTitle:@"Connect" forState:UIControlStateNormal];
    [self.connectButton setTitle:@"Disconnect" forState:UIControlStateSelected];
}

...

// Step 6. Implement connect button
- (IBAction)onConnectButton:(id)sender {
    UIButton *btn = (UIButton *)sender;
    if (btn.selected == NO) {
        [self.jc join:@"aaaaaaaaaa" type:@"random"];
        btn.selected = YES;
    } else {
        [self.jc leave];
        btn.selected = NO;
    }
}